My Libreboot T480
Notice
This guide is unofficial, it was created to facilitate installation and help. I am human and prone to errors, if you notice any mistakes, please let me know. The most reliable source is the official page:
Good luck with the installation. Welcome to the community.
Index
Resources
- Unofficial Guide by Mission_Catanloupe23 was one of the guides I based on.
- Official T480 Guide
- Official Programmer Guide
- Build Guide
- Vendor Guide
- Devmem Guide
- Grub Hardening Guide
- Download Link
- Libreboot 26.01 Release Notes
- Flashprog Download
- BIOS Download
- Unofficial Ezntek Guide
- Flash BIOS
- Geteltorito
Required Materials
- External computer or something that can run a Linux/BSD/Mac terminal
- USB drive
- Programmer, in my case, Raspberry Pi Pico
- SOIC-8 clip
- Jumper wires
- Internet
- Screwdriver
- Luck and patience
Downgrade/Upgrade Factory BIOS
wget https://download.lenovo.com/pccbbs/mobiles/n24ur39w.iso
git clone https://github.com/rainer042/geteltorito
chmod +x geteltorito/geteltorito.pl
geteltorito/geteltorito.pl -o t480_bios_update.img /path/to/your/downloaded.iso
sudo dd if=t480_bios_update.img of=/dev/sdX bs=4M conv=fsync status=progress
In BIOS:
- Disable Secure Rollback Prevention under UEFI BIOS Update Option.
- Enable Flash BIOS Updating by End Users.
- Disable SecureBoot.
Make sure the PC is well-charged or connected to power.
Then connect the USB drive and select it from the Boot menu (F12 before or during the LENOVO logo). Follow the instructions.
Before Flashing LIBREBOOT
In addition to the options above, add this and be careful with the following points on the T480:
- Enable Legacy BIOS.
- Remove the external battery.
- Disconnect the internal battery.
- Disconnect the CMOS battery.
Prepare Firmware/Flash Vendor Blobs
Next, on another PC:
Download the Libreboot image for the T480/T480s. Download from this page, select any link under HTTPS Mirror or other options, but those are recommended.
You should download the following file depending on your model, T480/T480s. In this case, T480:
stable/ -> 26.01/ -> roms/ -> libreboot-26.01_t480_vfsp_16mb.tar.xz
Also, download the sha512 (OPTIONAL):
stable/ -> 26.01/ -> roms/ -> libreboot-26.01_t480_vfsp_16mb.tar.xz.sha512
If you see this in the future, just replace 26.01 with the newest release number.
sha512sum -c libreboot-26.01_t480_vfsp_16mb.tar.xz.sha512
If they match, everything is fine.
Set up the git user:
sudo dnf install git
git config --global user.name "John Doe"
git config --global user.email "johnDoe123@email.com"
To flash the vendor blobs, we need lbmk:
git clone https://codeberg.org/libreboot/lbmk.git
Then:
cd lbmk
sudo ./mk dependencies fedora41
Or whichever distribution you are using (Check: config/dependencies/ for list of supported distros.):
sudo ./mk dependencies arch
sudo ./mk dependencies ubuntu
sudo ./mk dependencies debian
#...
Prepare Roms
Usually, you move the libreboot-26.01_t480_vfsp_16mb.tar.xz into lbmk. However, it can be anywhere, you just need to put the correct path.
Now, from rev8, the MAC address is automatically set with the following command:
cd lbmk
./mk inject libreboot-26.01_t480_vfsp_16mb.tar.xz
Raspberry Pi Pico
Download here as before.
stable -> 26.01 -> roms -> libreboot-26.01_serprog_pico.tar.xz
tar -xf libreboot-26.01_serprog_pico.tar.xz
cd bin/serprog_pico/
- Connect the Raspberry Pi Pico by pressing BOOTSEL, then mount it on /mnt.
- Now copy serprog_pico.uf2 to the Raspberry Pi Pico, i.e., to /mnt.
- That should be it. umount /mnt and sync, and you’re done.
To check, remount it, and the .uf2 should disappear. Then:
sudo dmesg | grep -i "tty"
You should see something like:
[ 1196.211884] cdc_acm 1-2:1.0: ttyACM0: USB ACM device
Remember ttyACM0 or the number that appears.
Flash
Install Flashprog
This should work, but it didn’t for me, so I had to do it manually in Method 2.
METHOD 1:
cd lbmk
./mk -b flashprog
METHOD 2:
Clone the repository:
git clone https://review.sourcearcade.org/flashprog.git
Then, install the corresponding dependencies. For Fedora:
sudo dnf install -y gcc meson ninja pkg-config pciutils libusb libftdi libgpiod libjaylink
To know which packages to install on other distributions, you can:
Go to flashprog/Documentation and check the building_meson.md file; it lists the dependencies for some distributions.
If not, search your distribution for the names of the dependencies listed on the Official Page. Then, to install flashprog:
cd flashprog
make
sudo make install
Connect SOIC-8
Connect the Raspberry Pi Pico to the SOIC-8 as shown in this image.
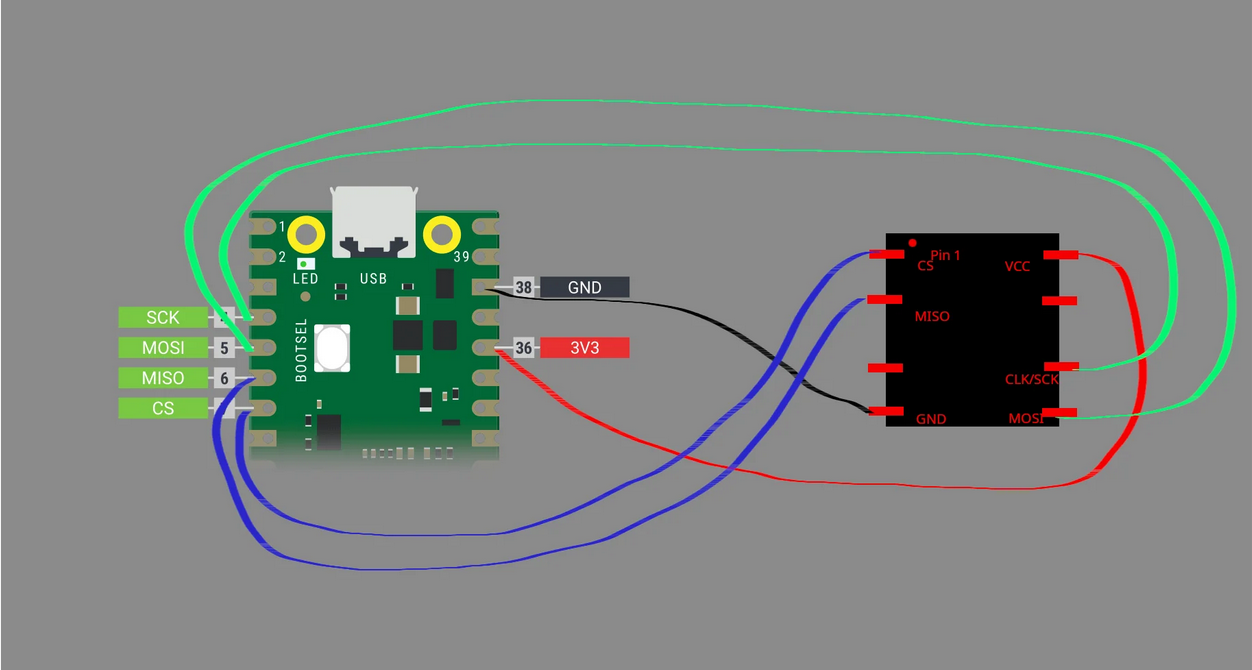 Image from Mission_Catanloupe23
The order of the jumpers is important, make sure to align them physically with the one in the image above.
Here are some of my images:
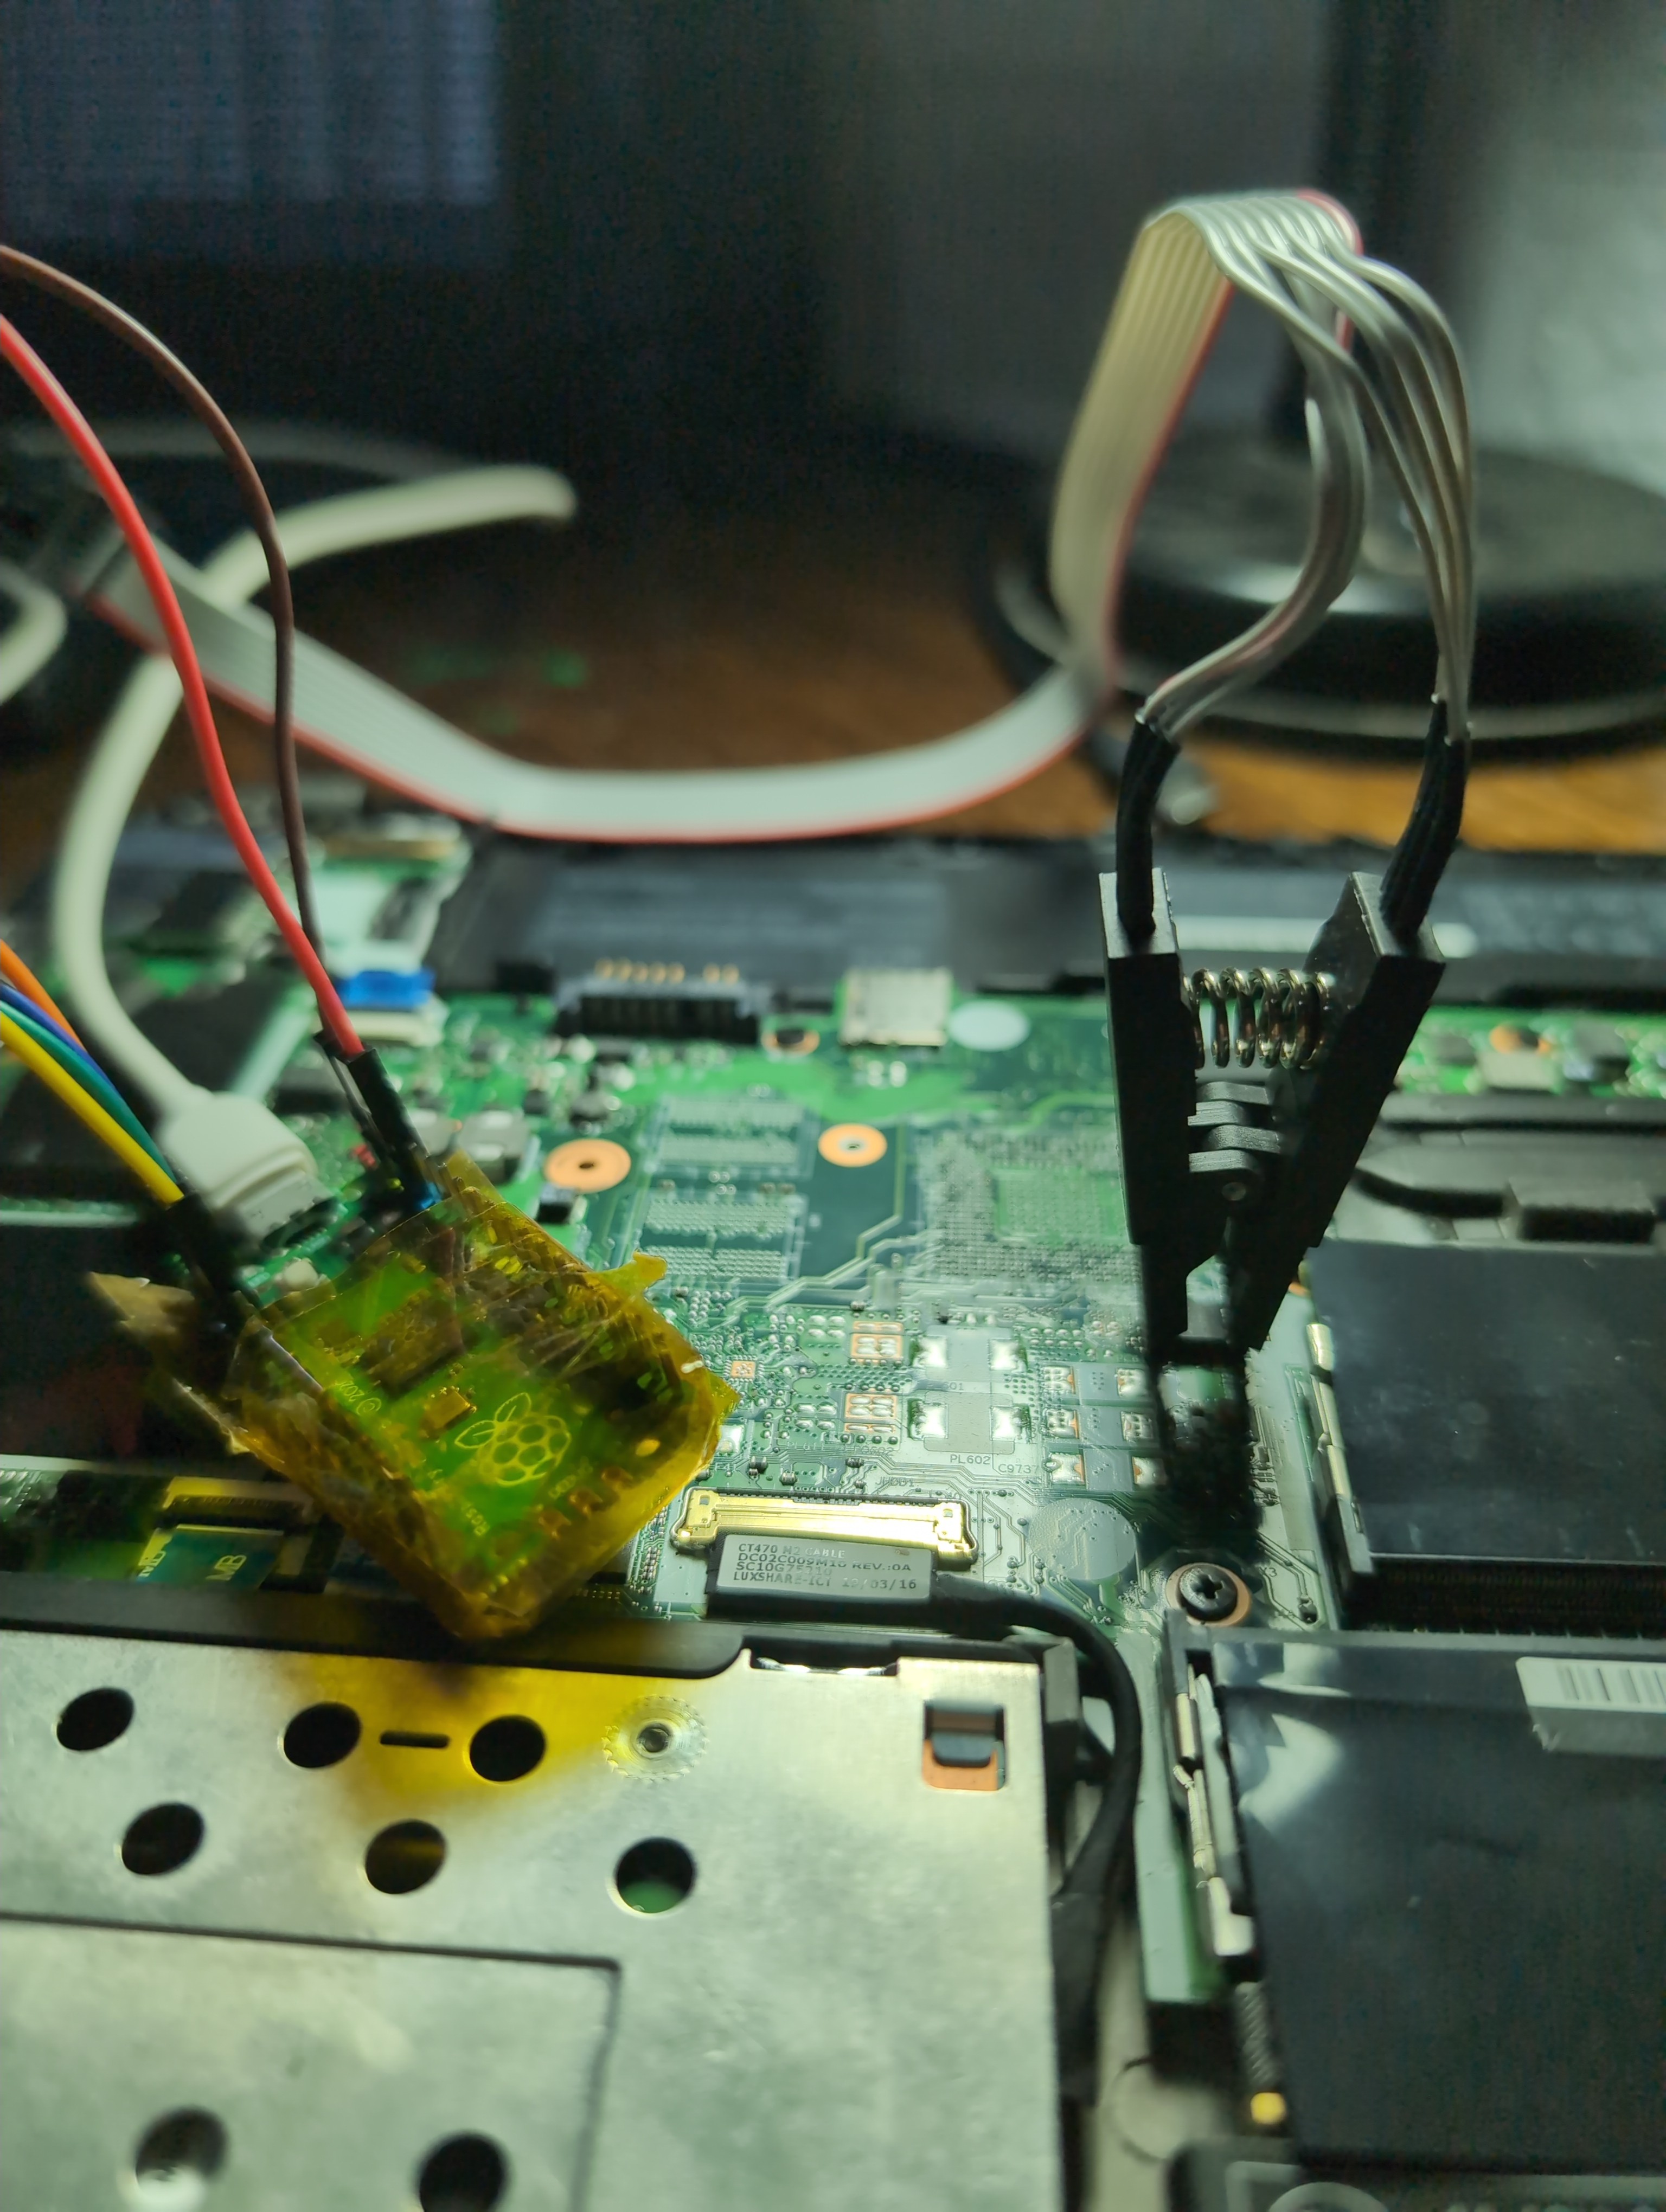
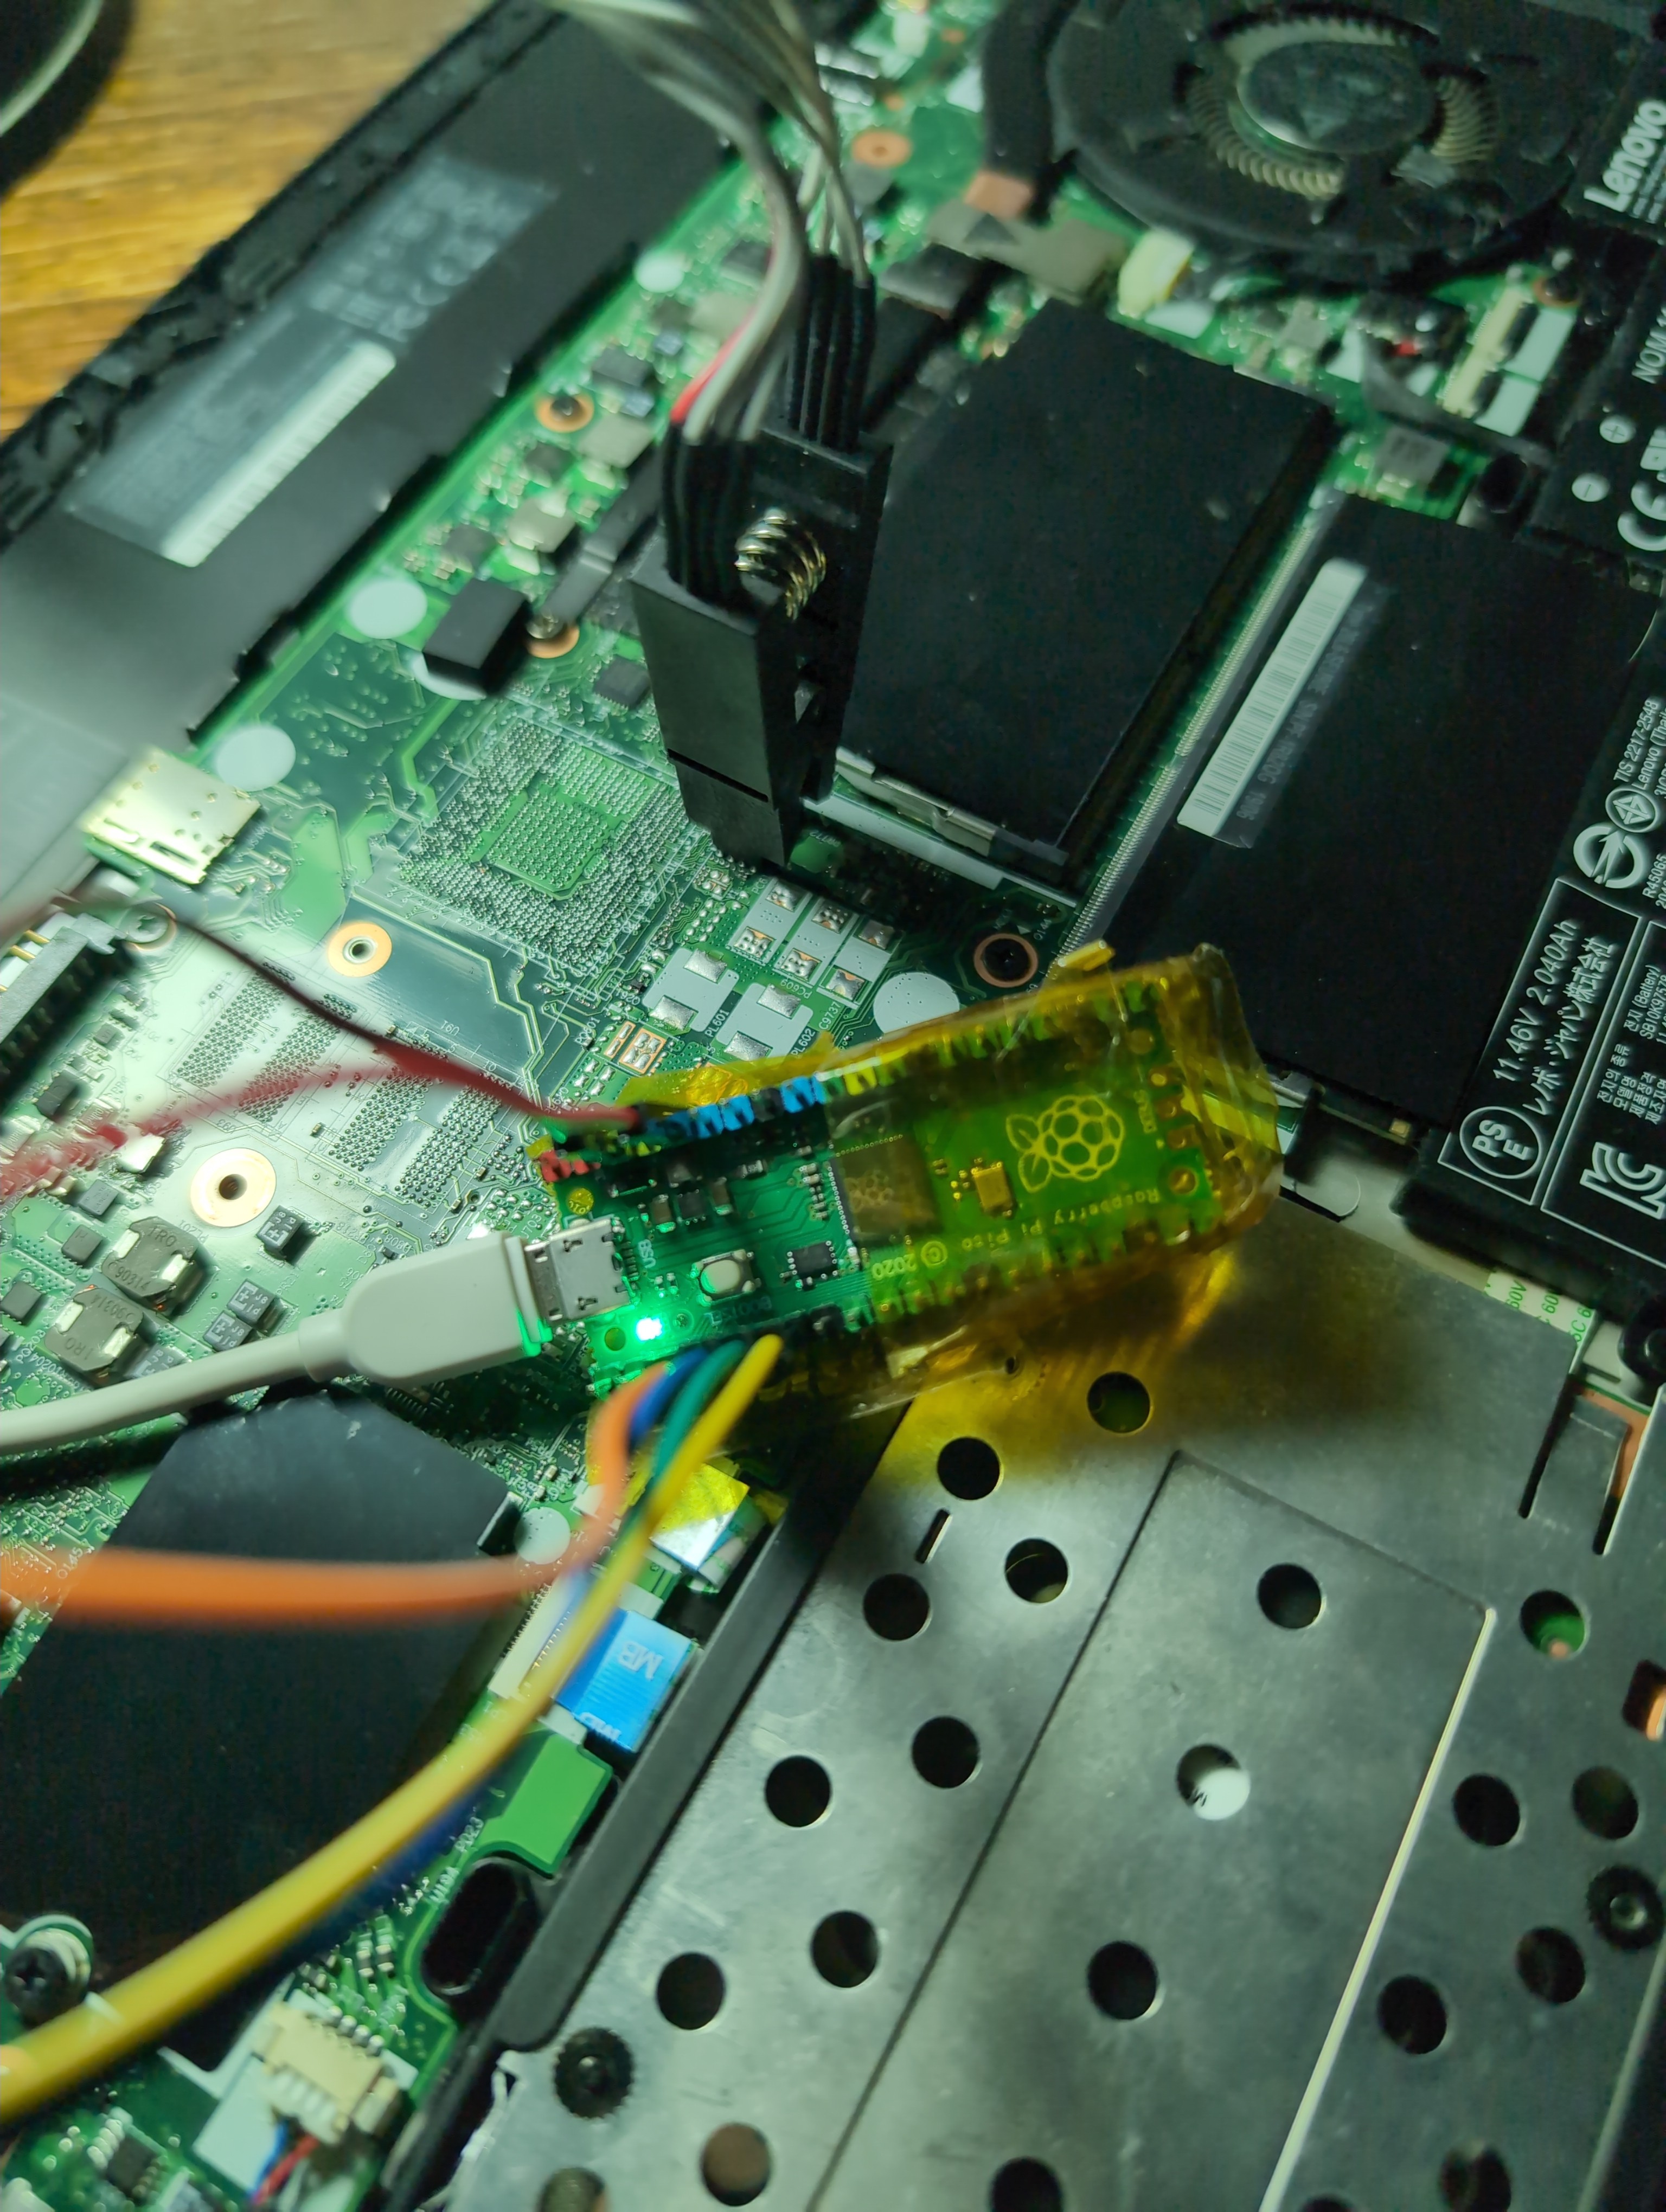
In the last one, it appears green because the flashprog command is being used.
BIOS Backup
We will need ttyACM0 (use the one you noted before) and the chip’s name (appears physically).
In my case, they are as follows, and we will perform some backups of BIOS and verify the connection of the clip:
sudo flashprog -p serprog:dev=/dev/ttyACM0 -c "W25Q128.V" -r t480_stockbios_1.bin
sudo flashprog -p serprog:dev=/dev/ttyACM0 -c "W25Q128.V" -r t480_stockbios_2.bin
sudo flashprog -p serprog:dev=/dev/ttyACM0 -c "W25Q128.V" -r t480_stockbios_3.bin
sha256sum t480_stockbios*.bin
If they don’t match, disconnect FIRST FROM THE PC, then disconnect the clip and reconnect it. When all the sha256 values match, you can proceed.
Select Rom and Flash
Extract libreboot-26.01_t480_vfsp_16mb.tar.xz:
tar -xf libreboot-26.01_t480_vfsp_16mb.tar.xz
cd /bin/t480_vfsp_16mb
Select the one you want and run:
sudo flashprog -p serprog:dev=/dev/ttyACM0 -c "W25Q128.V" -w seagrub_t480_vfsp_16mb_libgfxinit_corebootfb_usqwerty.rom
Congratulations!! Enjoy your new Libreboot.
Internal Flashing
This works for updates. If you already installed Libreboot using the above method, you can now do it internally without problems.
sudo vim /etc/default/grub
Search for GRUB_CMDLINE_LINUX and add iomem, if it has another parameter, place it next to it:
GRUB_CMDLINE_LINUX="iomem=relaxed other parameters"
In Fedora:
sudo grub2-mkconfig -o /boot/grub2/grub.cfg
In Debian:
sudo update-grub
In other distros, look it up.
Then, reboot.
These steps are necessary:
- Prepare Firmware/Flash Vendor Blobs
- Prepare Roms
- Install Flashprog
- Select Rom and Flash (Skip the last flashprog command)
Quick review
stable/ -> 26.01/ -> roms/ -> libreboot-26.01_t480_vfsp_16mb.tar.xz
Direct Link REMEMBER: This could be outdated
git clone https://codeberg.org/libreboot/lbmk.git
cd lbmk
# If is already setup don't override it
git config --global user.name "John Doe" # Can be any name and any email
git config --global user.email "johnDoe123@email.com"
sudo ./mk dependencies fedora41 # Your distro here if its accepted
./mk inject libreboot-26.01_t480_vfsp_16mb.tar.xz
./mk -b flashprog # Or check method 2 in "Install Flashprog"
tar -xf libreboot-26.01_t480_vfsp_16mb.tar.xz
cd /bin/t480_vfsp_16mb
Optional:
sudo flashprog -p internal -r bios-backup.bin
Internal Flashing:
sudo flashprog -p internal -w XXXX.rom # Select any .rom you like
# For example
sudo flashprog -p internal -w seagrub_t480_vfsp_16mb_libgfxinit_corebootfb_usqwerty.rom
Problems
Fedora Won’t Boot
It’s an easy problem to fix. It’s explained Here. Basically, for modern versions, it’s fixed by modifying the following line in /etc/default/grub:
GRUB_ENABLE_BLSCFG=false
Then:
sudo grub2-mkconfig -o /boot/grub2/grub.cfg
Time Synchronization Problem
If you have time issues due to removing the CMOS battery.
sudo timedatectl set-ntp false
sudo date -s -u "HH:MM:SS" # Check UTC time on any reliable website
sudo timedatectl set-timezone UTC # You can set your timezone here
sudo hwclock --systohc
sudo timedatectl set-ntp true
If it doesn’t work, it should be something similar. Use timedatectl to check times.
Sound Problem
This issue was mentioned by Mission_Catanloupe23, but in Libreboot 26.01 the jack detection issue is fixed. If you are on an older release and still see it, you can switch outputs manually in Pulseaudio Volume Control or pavucontrol.
Thunderbolt Flash
Thunderbolt support was added in 26.01 RC1, but it was removed before the final 26.01 release due to S3 resume issues. It is still in development/testing.
Doesn’t Turn On
An issue that happened to me was the following: the PC suddenly turned off and wouldn’t turn back on. The only thing it did was blink the power button light when plugged into a charger, but it wouldn’t power on or do anything else.
The solution is to open it up, disconnect the CMOS battery (and the internal battery too, if it has one), and to be sure, press and hold the power button for 30 seconds (with everything disconnected) to fully discharge the computer. Then reconnect everything and it should work.
My theory is that it might be an error related to the Thunderbolt port, but I have no idea why. Still, this is a simple and quick fix, so don’t panic if it ever happens to you.
Others
For more doubts or issues, check these official resources:
My Libreboot T480
Aviso
Esta guía no es oficial, está hecha para facilitar la instalación y ayudar a las personas de habla hispana, soy humano y no estoy falto de errores, cualquier error que vean avísenme. La fuente más confiable es la página oficial:
Éxito en la instalación. Bienvenido a la comunidad.
Índice
Recursos
- Guía no Oficial de Mission_Catanloupe23 fue una de las guías en las que me basé.
- Guía Oficial T480
- Guía Oficial Programador
- Build
- Vendor
- Devmem
- Grub Hardening
- Link Descargas
- Notas de lanzamiento Libreboot 26.01
- Descarga Flashprog
- Descarga BIOS
- Guía no Oficial de Ezntek
- Flash BIOS
- Geteltorito
Materiales Necesarios
- Computador externo o algo que pueda correr un terminal Linux/Bsd/Mac
- Pendrive
- Programador. En mi caso, Raspberry Pi Pico
- Clip SOIC-8
- Jumpers wires
- Internet
- Destornillador
- Suerte y paciencia
Downgrade/Upgrade BIOS de fabrica
wget https://download.lenovo.com/pccbbs/mobiles/n24ur39w.iso
git clone https://github.com/rainer042/geteltorito
chmod +x geteltorito/geteltorito.pl
geteltorito/geteltorito.pl -o t480_bios_update.img /path/to/your/downloaded.iso
sudo dd if=t480_bios_update.img of=/dev/sdX bs=4M conv=fsync status=progress
En BIOS:
- Desactivar Secure Rollback Prevention bajo UEFI BIOS Update Option.
- Activar Flash BIOS Updating by End Users.
- Desactivar SecureBoot.
Tener bien cargado el PC o conectado a corriente
Luego conectar el pendrive y seleccionarlo desde el menú de Boot. (F12 antes de que inicie o durante el logo de LENOVO) Sigue las instrucciones.
Antes de Flashear LIBREBOOT
Además de las opciones de arriba, agregar esta y tener cuidado con los siguientes puntos en el T480:
- Activar Legacy Bios
- Sacar batería externa
- Desconectar batería interna. (Si tiene)
- Desconectar pila CMOS.
Preparar Firmware/Flash Vendor Blobs
Luego en otro PC:
Descargar Libreboot imagen para el T480/T480s. Descargar en esta página baja un poco y selecciona cualquier link en HTTPS Mirror o otras opciones pero esos son los recomendados.
Debes descargar el siguiente archivo dependiendo de tu modelo T480/T480s. En este caso T480:
stable/ -> 26.01/ -> roms/ -> libreboot-26.01_t480_vfsp_16mb.tar.xz
También descargar el sha512 (OPCIONAL):
stable/ -> 26.01/ -> roms/ -> libreboot-26.01_t480_vfsp_16mb.tar.xz.sha512
Si ves esto en el futuro, solo reemplaza 26.01 por la versión más nueva.
sha512sum -c libreboot-26.01_t480_vfsp_16mb.tar.xz.sha512
Si son iguales todo está bien.
Configurar usuario de git
sudo dnf install git
git config --global user.name "John Doe"
git config --global user.email "johnDoe123@email.com"
Para Flashear los vendor blobs necesitamos lbmk:
git clone https://codeberg.org/libreboot/lbmk.git
Luego:
cd lbmk
sudo ./mk dependencies fedora41
O cualquiera que sea tu distribución (Revisar: config/dependencies/ para ver distros soportadas.):
sudo ./mk dependencies arch
sudo ./mk dependencies ubuntu
sudo ./mk dependencies debian
#...
Preparar Roms
Usualmente se mueve el libreboot-26.01_t480_vfsp_16mb.tar.xz adentro de lbmk en este caso es así. Sin embargo, puede estar donde quieras, solo tienes que poner la ruta correcta.
Ahora desde la rev8 el MAC address se configura automaticamente cuando hagamos el siguiente comando:
cd lbmk
./mk inject libreboot-26.01_t480_vfsp_16mb.tar.xz
Raspberry Pi Pico
Aquí descargar igual que antes.
stable -> 26.01 -> roms -> libreboot-26.01_serprog_pico.tar.xz
tar -xf libreboot-26.01_serprog_pico.tar.xz
cd bin/serprog_pico/
- Conectar el Raspberry Pi Pico apretando el BOOTSEL luego montarlo en /mnt.
- Ahora copiar serprog_pico.uf2 al Raspberry Pi Pico, es decir, a /mnt.
- Con eso debería estar listo. umount /mnt y sync y listo.
Para comprobar, vuelve a montar; debería desaparecer el .uf2. Luego:
sudo dmesg | grep -i "tty"
Deberia aparecer algo similar a:
[ 1196.211884] cdc_acm 1-2:1.0: ttyACM0: USB ACM device
Recordar ttyACM0 o el que te aparezca.
Flash
Instalar Flashprog
Esto debería funcionar pero a mí no me funcionó así que lo tuve que hacer manual en la Forma 2.
FORMA 1:
cd lbmk
./mk -b flashprog
FORMA 2:
Clonar repositorio:
git clone https://review.sourcearcade.org/flashprog.git
Luego instalar dependencias correspondientes. Para Fedora:
sudo dnf install -y gcc meson ninja pkg-config pciutils libusb libftdi libgpiod libjaylink
Para saber qué paquetes instalar en otra distribución puedes:
Ir a flashprog/Documentation y revisar archivo building_meson.md; ahí están las dependencias de algunas distribuciones.
De no ser, busca en tu distribución el nombre de las dependencias que aparecen en la Página oficial. Luego, para instalar flashprog:
cd flashprog
make
sudo make install
Conectar SOIC-8
Conectar Raspberry Pi Pico al SOIC-8 como se observa en esta imagen.
Imagen sacada de Mission_Catanloupe23
Es importante el orden de los jumpers y para colocarlo bien. Ver la endidura físicamente y cuadrarla con la que sale en la imagen de arriba
Estas imagenes son mias:
En esta última aparece verde porque se está usando el comando flashprog
BIOS Backup
Ahora necesitaremos ttyACM0 (poner el que anotamos antes) y el nombre del chip (aparece físicamente).
En mi caso son los siguientes y realizaremos copias del BIOS y verificaremos la conexión del clip:
sudo flashprog -p serprog:dev=/dev/ttyACM0 -c "W25Q128.V" -r t480_stockbios_1.bin
sudo flashprog -p serprog:dev=/dev/ttyACM0 -c "W25Q128.V" -r t480_stockbios_2.bin
sudo flashprog -p serprog:dev=/dev/ttyACM0 -c "W25Q128.V" -r t480_stockbios_3.bin
sha256sum t480_stockbios*.bin
Si no salen iguales desconectar PRIMERO DESDE EL PC y luego desconectar el clip y volverlo a poner. Cuando salgan todos los sha256 iguales podremos continuar.
Seleccionar Rom y luego Flashear
Descomprimimos libreboot-26.01_t480_vfsp_16mb.tar.xz
tar -xf libreboot-26.01_t480_vfsp_16mb.tar.xz
cd /bin/t480_vfsp_16mb
Seleccionamos el que deseamos y corremos
sudo flashprog -p serprog:dev=/dev/ttyACM0 -c "W25Q128.V" -w seagrub_t480_vfsp_16mb_libgfxinit_corebootfb_usqwerty.rom
¡¡Felicitaciones!! Disfruta de tu nuevo libreboot.
Internal Flashing
Esto funciona para actualizar. Si ya instalaste libreboot de la forma de arriba puedes hacerlo de forma interna ahora sin problemas.
sudo vim /etc/default/grub
Buscar GRUB_CMDLINE_LINUX y agregar iomem si tiene otro parametro ponerlo al lado:
GRUB_CMDLINE_LINUX="iomem=relaxed otros parametros "
En Fedora:
sudo grub2-mkconfig -o /boot/grub2/grub.cfg
En Debian:
sudo update-grub
En otras distribuciones, busca.
Luego hacer un reboot.
Son necesarios estos pasos:
- Preparar Firmware/Flash Vendor Blobs
- Preparar Roms
- Flashprog
- Rom y Flashear (Aquí hacer todo menos el último comando de flashprog, ya que cambia al que mostraré a continuación)
Repaso rápido
Descargar aquí (cualquier link)
stable/ -> 26.01/ -> roms/ -> libreboot-26.01_t480_vfsp_16mb.tar.xz
Link directo RECORDAR: Esto puede estar desactualizado; revisar siempre si hay una versión más actualizada.
git clone https://codeberg.org/libreboot/lbmk.git
cd lbmk
# Si no está seteado ya, tampoco es necesario que sea global
git config --global user.name "John Doe" # Puede ser cualquier nombre y cualquier correo
git config --global user.email "johnDoe123@email.com"
sudo ./mk dependencies fedora41 # O la distro que tengas
./mk inject libreboot-26.01_t480_vfsp_16mb.tar.xz
./mk -b flashprog # O revisar método 2 en Flashprog
tar -xf libreboot-26.01_t480_vfsp_16mb.tar.xz
cd /bin/t480_vfsp_16mb
Opcional:
sudo flashprog -p internal -r bios-backup.bin
Flasheo interno:
sudo flashprog -p internal -w XXXX.rom # .rom a elección
# Por ejemplo
sudo flashprog -p internal -w seagrub_t480_vfsp_16mb_libgfxinit_corebootfb_usqwerty.rom
Problemas
Fedora No Arranca
Es un problema sencillo de resolver; está explicado. Aquí. Básicamente para versiones modernas se soluciona modificando la siguiente línea en /etc/default/grub:
GRUB_ENABLE_BLSCFG=false
Luego:
sudo grub2-mkconfig -o /boot/grub2/grub.cfg
Problema Sincronización de Hora
Si tienes problemas con la hora por sacar la pila CMOS.
sudo timedatectl set-ntp false
sudo date -s -u "HH:MM:SS" # Ver hora UTC en alguna página confiable
sudo timedatectl set-timezone UTC # Revisar este comando. Aquí se puede poner tu zona horaria
sudo hwclock --systohc
sudo timedatectl set-ntp true
Si no funciona debe ser algo muy similar. Con timedatectl revisar horas.
Problema Sonido
Problema mencionado por Mission_Catanloupe23, pero en Libreboot 26.01 el problema del jack ya está corregido. Si estás en una versión anterior y aún te pasa, cambia la salida manualmente en Pulseaudio Volume Control o pavucontrol.
ThunderBolt Flash
El soporte de Thunderbolt se agregó en 26.01 RC1, pero se retiró antes de la 26.01 final por problemas al reanudar (S3). Sigue en desarrollo/pruebas.
No Prende
Un error que me pasó a mí fue el siguiente: el PC de repente se apagó y no prende. Lo único que hace es, al conectarlo a un cargador, parpadear la luz del botón de encendido, pero no enciende ni hace nada.
La solución es abrirlo, desconectar la batería CMOS (también la batería interna, si tiene), y, para asegurarse, presionar durante 30 segundos el botón de encendido (con todo desconectado) para descargar al 100% el computador. Luego, conectar todo y listo.
Mi teoría es que puede ser un error por el Thunderbolt, pero no tengo idea de la razón. Aun así, esta es una solución sencilla y rápida, para que no se asusten si les llega a pasar.
Otros
Para más dudas o problemas revisar estos recursos oficiales: